Cabinet Refinishing San Jose CA project can completely transform the look of a kitchen, bathroom, or laundry room without the expense of replacing cabinets entirely. Fresh finishes, modern colors, and updated surfaces often make older spaces feel cleaner, brighter, and more stylish. However, refinishing is not a project homeowners should rush into without careful planning. The quality of the final result depends heavily on the condition of the cabinets, the preparation process, the materials used, and the experience of the contractor performing the work. Asking the right questions before cabinet refinishing helps homeowners avoid costly mistakes and ensures the finished cabinets meet both functional and design expectations.
Are the Existing Cabinets Structurally Sound?
One of the first questions homeowners should ask is whether the existing cabinets are actually good candidates for refinishing. Cabinet refinishing works best when the cabinet boxes and doors are still structurally strong. Cabinets with severe water damage, warping, mold, or broken frames may not respond well to refinishing and could require replacement instead.
Many older kitchens contain solid wood cabinets that remain durable even after decades of use. In these cases, refinishing can provide dramatic visual improvement while preserving high quality construction. However, low quality particle board cabinets or cabinets with extensive damage may not justify the investment.
A professional inspection helps determine whether refinishing is practical or whether more extensive renovation work would provide better long term value. Understanding the true condition of the cabinets prevents homeowners from spending money on cosmetic improvements that may not last.
What Type of Finish Will Be Used?
The type of finish selected has a major impact on both appearance and durability. Homeowners should ask whether the cabinets will be painted, stained, glazed, or sealed with protective topcoats. Different finishes create very different visual effects and maintenance requirements.
Painted finishes are popular for modern kitchens because they provide clean colors and contemporary style. Stained finishes preserve natural wood grain and create warmer appearances. Satin and semi gloss finishes are often recommended because they resist moisture and are easier to clean.
Homeowners should also ask what type of products will be used during refinishing. Cabinet grade paints and professional coatings are far more durable than standard wall paint. Understanding the materials being used helps ensure the refinished cabinets will withstand daily kitchen use over time.
How Will the Cabinets Be Prepared?
Preparation is one of the most important parts of cabinet refinishing, yet it is often overlooked by homeowners unfamiliar with the process. Asking detailed questions about preparation helps separate professional refinishing services from rushed or low quality work.
Cabinets should be thoroughly cleaned to remove grease, oils, and residue before sanding begins. Sanding creates texture that allows primer and paint to bond properly to the surface. Homeowners should ask whether the cabinets will be sanded manually or with professional equipment and whether damaged areas will be repaired before painting or staining.
Proper preparation also includes removing doors, drawers, and hardware. Painting around hinges or handles usually leads to uneven finishes and poor durability. Understanding the preparation process helps homeowners know whether the contractor is prioritizing long term results rather than quick cosmetic improvement.
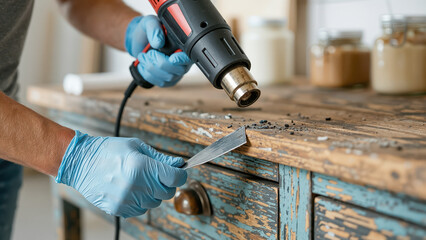
Will the Cabinets Be Sprayed or Hand Painted?
Another important question involves the painting method. Professional cabinet refinishing companies often use spray systems because they create smoother and more factory like finishes. Spray applications generally reduce visible brush marks and provide more even coverage.
Some painters use brushes and rollers instead, especially for smaller projects or touch ups. While hand painting can still produce attractive results, the final appearance may differ from sprayed finishes. Homeowners should ask which method will be used and why it is recommended for their specific cabinet style and material.
The painting environment also matters. Spray painting often requires controlled conditions and proper ventilation to prevent dust and debris from affecting the finish. Understanding the application process helps homeowners set realistic expectations for the final appearance.
How Durable Will the Finish Be?
Durability is one of the biggest concerns for homeowners considering cabinet refinishing. Kitchens are high traffic spaces where cabinets experience moisture, grease, heat, and constant handling every day. Homeowners should ask how long the finish is expected to last and what type of maintenance will be required.
Professional cabinet refinishing can often last for many years when high quality products and proper preparation techniques are used. However, durability depends heavily on the materials chosen and how the cabinets are cared for after refinishing.
Homeowners should also ask whether protective topcoats or sealants will be applied. These coatings help improve resistance against scratches, moisture, and daily wear. Understanding the expected lifespan of the finish helps homeowners evaluate the overall value of the project.
How Long Will the Project Take?
Kitchen renovations can disrupt daily life significantly, so homeowners should ask how long the refinishing project is expected to take from start to finish. Cabinet refinishing is usually much faster than full replacement, but drying and curing times still require careful scheduling.
The timeline often depends on the size of the kitchen, the condition of the cabinets, the type of finish being applied, and environmental conditions such as humidity and ventilation. Homeowners should ask whether they will have access to parts of the kitchen during the project and how long the cabinets will need to cure before normal use.
Rushing the process can damage the finish and reduce durability, so understanding the timeline helps homeowners prepare properly and avoid unnecessary frustration during the renovation.
What Colors and Styles Work Best for the Kitchen?
Choosing the right cabinet color is one of the most important design decisions in the refinishing process. Homeowners should ask which colors and finishes will complement the size, lighting, flooring, countertops, and overall style of the kitchen.
Neutral colors such as white, gray, and soft earth tones remain highly popular because they create bright and timeless kitchens that appeal to a wide range of tastes. Darker colors such as navy blue or black can create dramatic modern designs but may require stronger lighting to avoid making the space feel smaller.
Homeowners should also ask whether new hardware or additional upgrades are recommended. Modern handles, knobs, and soft close hinges can significantly enhance the final appearance of refinished cabinets.
What Type of Maintenance Will Be Needed?
Cabinet refinishing is an investment, and homeowners should understand how to maintain the cabinets after the project is complete. Asking about proper cleaning products, moisture protection, and long term care helps preserve the finish and extend durability.
Professionals often recommend avoiding abrasive cleaners and harsh chemicals that may damage painted or stained surfaces. Gentle cleaning methods and prompt attention to spills help maintain the appearance of refinished cabinets for many years.
Homeowners should also ask how to handle minor scratches or chips if they occur later. Knowing whether touch up services are available can provide additional peace of mind after the project is finished.
Is Cabinet Refinishing More Cost Effective Than Replacement?
Many homeowners choose refinishing because it is significantly less expensive than replacing cabinets entirely. However, it is still important to ask whether refinishing is truly the best value for the specific kitchen.
If the cabinet structure remains strong and the layout works well, refinishing often provides excellent visual improvement at a fraction of replacement costs. However, kitchens with severe structural damage, poor storage design, or outdated layouts may benefit more from replacement.
Understanding the cost difference between refinishing and replacement helps homeowners make informed decisions based on budget, long term goals, and the overall condition of the kitchen.
Why Experience and Reputation Matter
Homeowners should always ask about the experience and qualifications of the cabinet refinishing contractor. Cabinet painting and refinishing require specialized preparation, products, and techniques that differ significantly from standard interior painting.
Experienced cabinet refinishing professionals understand how to work with different cabinet materials, finishes, and kitchen conditions. Asking to see previous projects or customer references can help homeowners evaluate the quality of workmanship and consistency of results.
A reputable contractor should also explain the process clearly, provide realistic timelines, and answer questions openly. Good communication helps homeowners feel more confident throughout the refinishing project.
Conclusion
Cabinet refinishing can dramatically improve the appearance of a kitchen while avoiding the cost and disruption of full cabinet replacement. However, the success of the project depends heavily on planning, preparation, materials, and professional experience. Asking the right questions before cabinet refinishing helps homeowners make informed decisions and avoid disappointing results.
Questions about cabinet condition, preparation methods, durability, finishes, timelines, and maintenance all contribute to a smoother and more successful refinishing experience. Understanding the process also helps homeowners set realistic expectations for both appearance and long term performance.
When completed properly, cabinet refinishing offers a practical and visually impressive way to modernize kitchens, refresh outdated cabinetry, and improve the overall atmosphere of the home for many years to come.